silent soul
Emo Rocks
Life is puuuurfect
any similarity
to another tutorial is strictly coincidental
please do not copy my work or claim as your own
supplies:
tube PTU
anna marine
you can purchase it it Here
scrap kit : PTU Emo Rocks
by DwanaDesigns
you can purchase the kit HERE
frame Here
plug ins
xero/radience/porcelain/mistifier
open your frame layer in psp
open your tube and minimise
choose a paper from your kit
paste as new layer
drag below the frame layer using your raster deform tool bring the paper down so that it fits inside the frame
you will find that the corners of the paper show
using your eraser tool erase any of the paper showing beneath the frame
find a nice element and copy paste as new layer resize if needed
add a drop shadow of choice
copy your tube and paste as new layer
duplicate your layer tube
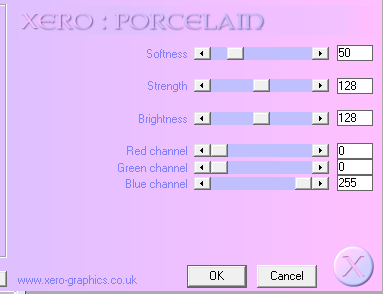
on your original layer tube effects/plug ins / xero /porcelain
with the setting below
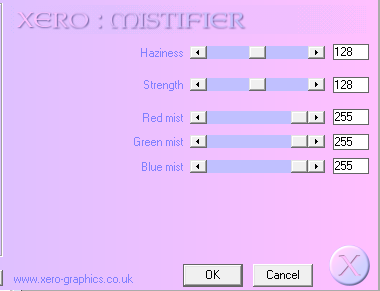
on your copy tube layer effects/plugins/xero /mistifier with settings below
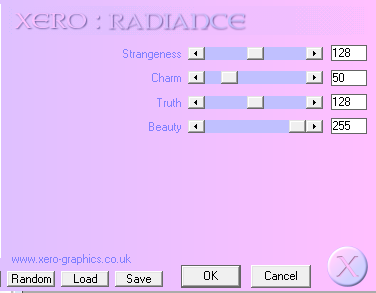
again on your copy tube layer effects / plugins / xero / radience with the setting below
on your blend mode in your layer pallatte change the blend to screen and change the opacity to 70%
with your copy tube highlighted right click and merge/merge down
find a doodle in your kit and copy paste as new layer drag it below the bottom layer
drag it slightly to the left so some of the doodle shows under the left side of the frame
on doodle layer right click /duplicate
image /mirror and again just tweak it so it looks like the left side
add a couple of elements to the top left of the frame resizing them to around 40%
add a drop shadow of choice to each element and your tube
then layers / merge /merge visible
add your copyright/url and licence if you have one for your tube
layers/merge/merge visible
duplicate your merged layer
then on original layer resize by 85% on your copy layer resize by 80%
highlight your original merged layer
adjust/blur/Gaussian blur 21
on your copy layer adjust sharpness / sharpen click once only
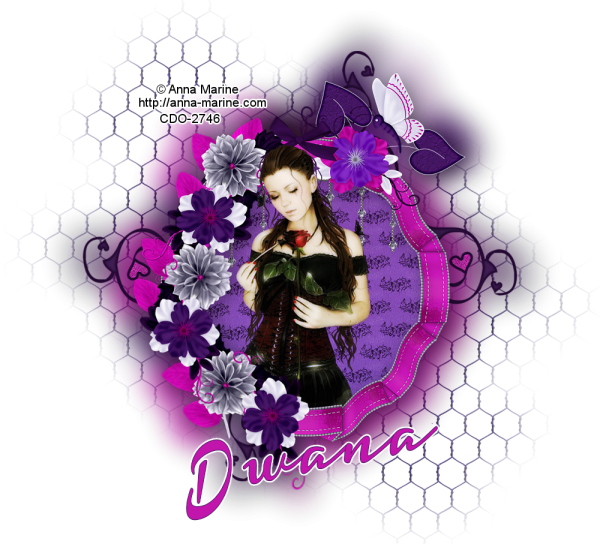
now add your name
if you have some kind of netting then copy paste as new layer and drag to bottom of layer pallette place it where you like the look and if needed duplicate and mirror to give the effect i have
add your name and your done
hope you enjoyed this tutorial :o)
~~~~~~~~~~~~~~~~~~~~~~~~~~~~~~
Emo Rocks
any similarity
to another tutorial is strictly coincidental
please do not copy my work or claim as your own
supplies:
tube PTU
© keith Garvey
you can purchase it Here
scrap kit : PTU Emo Rocks
by Kimmilicious Kreationz
you can purchase the kit HERE
plug ins
xero/radience/porcelain/mistifier
paint shop pro
animation shop 3
eye candy / glass
open a new raster layer 1000x1000 we will resize later
choose a paper from the kit and open in your psp
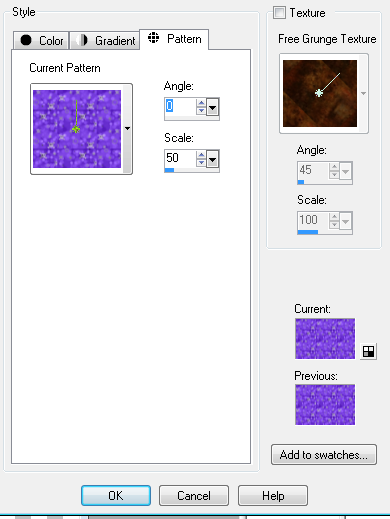
on your forground pallette
go to patterns and find your paper with the settings below
using your eclipse tool
with the settings below
hold down shift and draw a large circle
right click on your vector layer in the layers pallette and convert to raster layer
selections/select all/selections/float/selections/defloat
add a new raster layer make sure this layer is active
using you flood fill tool
click inside the marching ant
you will now see your paper as a circle
name this layer frame
selections/select none
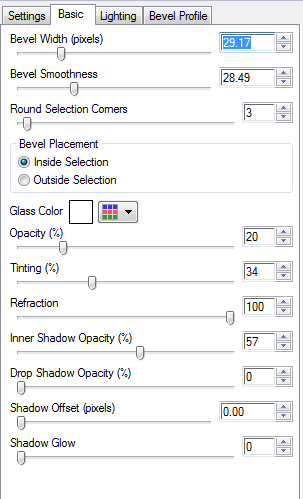
go to effects /plugins/eye candy/glass with settings below
now delete the original circle from the layer pallette by clicking the small x far right at top of layer pallette
open another contrasting paper and copy/paste into your work layer
drag below your frame layer
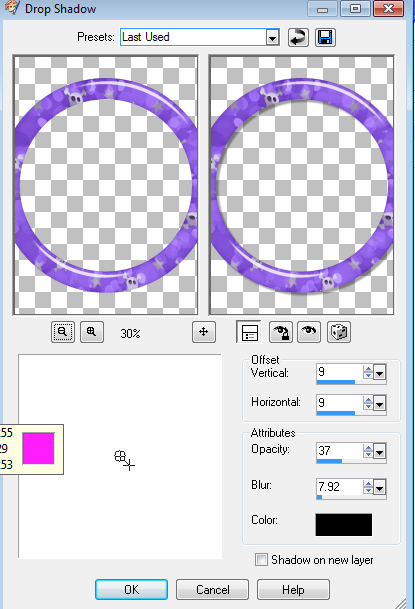
on your frame layer add a drop shadow as below
using your deform tool make the paper smaller
using your eraser tool erase any of the paper showing outside the edges of the frame
open an element resize by 60% and again copy paste onto your work layer
drag below frame layer
open your tube and drag below the frame
in the layer pallette change the blend mode to luminous
any of the tube showing below the frame using eraser tool erase
again copy /paste your tube onto your work layer and postition where you want it
add a drop shadow of choice
finding some more of the elements
copy and paste then place them where you like them
resize if needed
add a drop shadow as above to each element
add your copyright and url of your tube artist
if it is a PTU tube then also make sure to add your licence number
once you have decorated your tag with all the elements you want to use
go to layers /merge visible
duplicate the merged layer
image resize by 85% on copy layer again image resize by 80%
on your original merged layer go to adjust blur gaussian blur by 16
lower the opacity of your blurred layer to 50%
layers merge /merge visable
eye animation
if you wish to animate this tag follow the instuctions below
duplicate the merged layer
twice more
zoom into your tag using the scroll on your mouse
to the face making sure you have zoomed into the eye on the tube you wish to animate
click on your forground and choose a light colour of the eye lid
on your background colour choose a dark colour at the edge of the eye
changing the colours on the eye as you paint over it so that it looks like the eye is closing on second layer paint and cover all the eye untill you have it coloured then choose black and put a line along the bottom for the eye liner
keep zooming in and out checking that the colours merge properly
on top layer leave as is
on bottom and middle layer using your soften brush gently just click where you have painted to soften it
same on top layer
starting with top layer
right click copy
open your animation shop and paste as new animation
back to psp and highlight the middle layer and again copy / go to animation shop and right click the frame and choose paste before animation
repeat this with your bottom layer
stretch out your layers in animation shop
so you can see each frame
on the first frame where eye is fully open
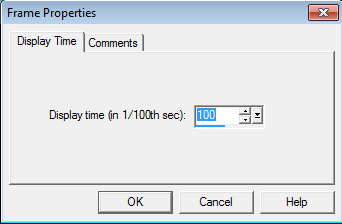
go to animation and choose frame properties
make the number 100
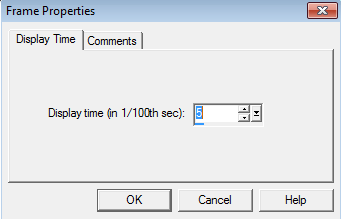
on second frame highlight and again animation frame properties and make that 5
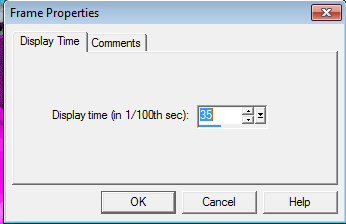
on last frame again animation frame properties and make the number 35
at top left of animation shop you will see a small film strip this will bring up the animation so you can check it looks right
back to paint shop pro
choose a font of choice and write your name
copy paste this into animation shop again pasting as new animation again click on first frame of name and paste before current frame
once again paste before current frame
highlighting your first frame in yourname animation
go to edit select all /edit propergate paste
on your tag frames click on first frame to hight light /edit select all
on your name animation clikandhold and drag your name to where you want it on your tag frame
it should copy all the frames of your name onto your tag
to make sure again click on the animation top right to see if your name is copied onto ech of your tag animation if it shows your are done
hope you enjoyed this tutorial
Life is puuuurfect
any similarity
to another tutorial is strictly coincidental
please do not copy my work or claim as your own
supplies:
scrap kit : PTU KK_cat_dog
by Kimmilicious Kreationz
you can purchase the kit HERE
open a new work area 800x800
we will resize later
find your first paper and copy/paste as new layer into work area
using your preset oval shape and foreground active (x out background )
draw a circle with a colour that will enhance your paper
right click vector layer and promote to raster layer
selections / select all, selections /float
selections/defloat , selections /invert
now highlight your paper layer and hit delete on your keyboard
selections/invert
staying on your paper layer selections modify /modify contract by 5
again hit delete on your keyboard
drag your circle below your paper layer in layer pallette
highlighting the circle layer
adjust /add remove noise/ noise at 50%
effects/plugins/dsb flux /with setting below
click to highlight paper layer in layer pallette
layers/merge/merge down
right click on the layer and rename the paper layer to frame
find the tube of choice and place it under the frame layer
highlight your tube layer in your layer pallette
selections/select all/select float /select defloat
highlight your frame layer and using your eraser tool erase the top of the frame covering the top of your tube
duplicate your tube layer then highlight original tube layer
effects/plugins/xero /porcelain /with the setting below
on your copy tube layer effects/plugins/xero mistifier with settings below
effects/plugins/xero radience with setting below
on your copy tube layer on blend mode choose soft light and if you wish lower opacity to 80%
on copy tube layer right click merge /merge down
now add your other elements from the kit and place them where you like them
add a drop shadow to all as below
layers/merge/merge visable
on my tag i used an element cats paw print and resized by 15%
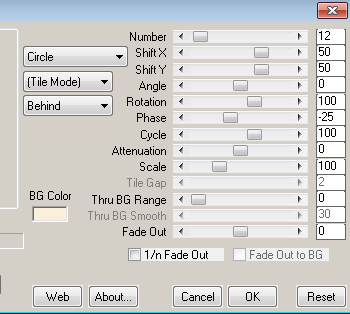
effects /plugins/mura's meister/copies as shown below ( this is optional )
drag this layer to bottom of your layer pallette
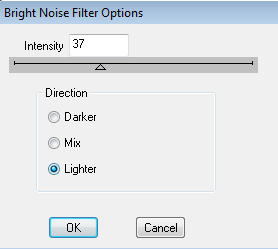
add noise to taste and a drop shadow
again layers/merge/merge visible
duplicate layer
on duplicate layer resize by 80%
on original layer resize by 85%
on original layer adjust/blur/gaussian blur 38%
new raster layer
using your paint brush /on circle size five
click once in the middle of your work area
effects/plugins/muras meister/copies/tiling
highlight your blurred layer
selections/select all/select float/select defloat/select invert
hit delete on your keyboard
this should put the dots you tiled so they are only on your your blurred layer
(see mine for preview)
adjust/add remove noise / 80%
now add some words
i chose mine because i used the cat from the kit
add your name and if you used a ptu tube add copyright/url and licence
if ftu tube add copyright and url
add your name
merge merge visable
resize to a size you like and your done
remember to save as a png
hope you enjoyed this tutorial :o)







No comments:
Post a Comment